
How to Lock a Trail Camera to a Tree With a Cable Lock or Python Lock
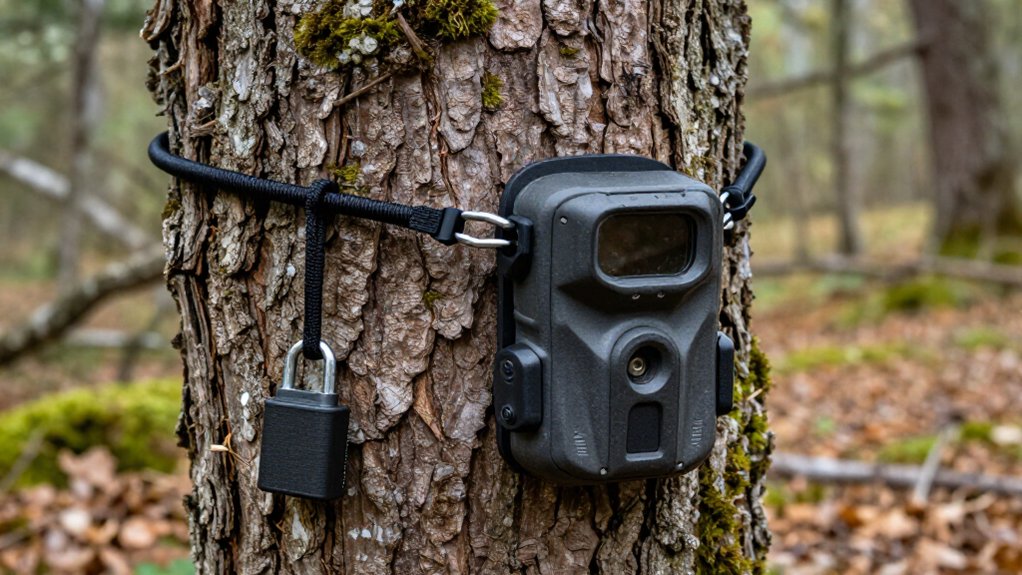
Verify that your bracket or security case accepts the 5/16-inch (8 mm) cable, then clear loose bark so the mount sits flat.
Open the Python lock, route the cable through the bracket or case twice if supported, and wrap it around healthy, solid trunk wood.
Feed the free end through the locking head, pull all slack out, lock it, and tug-test the camera.
Keep the cylinder sheltered and seasonally graphite-lubricated; further guidance ahead covers weather and troubleshooting.
Five-Minute Trail Camera Locking
For a fast, secure installation, wrap a 5/16-inch (8 mm) vinyl-coated braided-steel Python cable around a solid tree trunk, route it through your trail camera’s lock bracket or compatible security case, and pull it tight. Choose a trunk that cannot be easily moved, and position the camera at your planned viewing angle before locking. Remove all cable slack to limit cutting leverage and prevent the unit from twisting.
Set the Python lock’s patented mechanism to the exact working length, using its infinite locking positions, then engage it with the key. The flexible, vinyl-coated cable threads quickly around irregular trunks, while its camo finish reduces visibility. Finish by tugging firmly on the cable and camera. You confirm the lock holds; no loop can slip free.
Confirm Cable Diameter Compatibility
Before you lock the camera in place, verify that its bracket, security case, and anchor path accept the Python cable’s 5/16-inch (8 mm) diameter. This Master Lock Python uses braided steel cable, so every passage must clear it without binding.
- Check camera brackets and case openings for a clean 5/16-inch pass-through.
- Test strap holes, bracket slots, and guides; don’t let edges pinch or concentrate stress.
- Thread the cable through the complete bracket-to-anchor route before securing it.
- Pull it taut during the dry run; interference signals an incompatible setup.
If your mount needs a larger diameter, use the 3/8-inch Professional Python model instead. Never force the cable through undersized hardware: damaged coatings, restricted tension, or distorted slots weaken retention and can make removal for thieves.
Step 1: Clear Bark Around Mounting Spot
Once you’ve confirmed cable compatibility, prepare the mounting surface so the camera and lock sit securely against the trunk. Choose a reachable, solid section of trunk and clear only the mount zone. Remove loose flakes, raised bark ridges, and trapped debris until the camera bracket can rest flat. This reduces gaps that allow the housing to shift when you tighten the cable loop and eliminate slack.
If the 5/16-inch (8 mm) vinyl-coated braided steel cable passes near the bracket, smooth its contact path to prevent abrasion on sharp bark edges. Wipe away remaining dust and sap, then check that the mount contact points grip cleanly. Keep the cleared patch small and concealed around the mounting area, preserving camouflage while supporting a snug, stable, weather-resistant installation.
Step 2: Open the Python Lock
Use one of the four keyed-alike keys included with the Master Lock Python adjustable camo cable lock to open its locking head. Insert the key fully, turn it as directed, and release the head. Keep keys secured separately; keyed-alike spares simplify service.
Once open, test the mechanism by pulling the 5/16-inch (8 mm) braided steel, vinyl-coated cable through the locking head. It should slide freely, confirming the adjustable clamp is disengaged and ready for precise sizing. Inspect the head, keyway, and cable for dirt, corrosion, crushed strands, or binding before use. Don’t force a resistant key or cable, because damage can prevent secure closure.
Leave the head open until you’ve set the cable length taut; minimizing slack reduces leverage and cutting opportunities for thieves.
Step 3: Thread Cable Through Camera Bracket
With the Python lock head open, open or loosen the camera’s lock bracket and feed the 5/16-inch (8 mm) cable through its designated attachment point. If you’re using a security case, route the cable through the case’s built-in loop or holes, not only the camera body. This restrains the enclosure instead of leaving the case vulnerable.
Feed the braided-steel cable in the direction that lets you draw it tight without crossing or twisting it. Then return the cable through the bracket or manufacturer-recommended secondary routing point. This doubled path prevents someone from pulling the cable free from a single opening. Position the camera so the cable runs straight between the bracket and its anchor location. Check bracket closure and eliminate leverage gaps before continuing.
Step 4: Lock Cable Around Tree Trunk
Wrap the braided-steel cable around a solid section of the tree trunk, keeping it low enough to avoid weak branches or loose bark and tight enough to eliminate slack. Choose healthy, mature wood that won’t flex or shed bark during long-term exposure. The protective vinyl coating reduces abrasion against the trunk and cable as weather changes.
Feed the free end back through the Python-style locking head, using its infinite-position adjustment to match the trunk’s circumference precisely. Pull firmly until the loop is taut; remaining slack creates leverage, flapping, and room for tampering. Key the cylinder lock completely, then tug the cable and locking head hard. If anything slips, disengage it, reset the cable, and test again before leaving the camera unattended outdoors for months.
Step 5: Center Camera Before Tightening
Set the trail camera squarely on the tree face or mounting bracket before you draw the cable tight. Thread the Python lock through the camera’s lock bracket or security case, then hold the unit centered at the intended angle. Don’t cinch the cable first and try to reposition the camera afterward; tightening can pull the housing off line and change its coverage area.
Apply even tension to both cable sides as you draw it snug around the trunk. This reduces slack, which otherwise gives a thief leverage for cutting, twisting, or tampering. Use the lock’s infinite adjustable positions to secure the cable at the centered placement. Once you engage the lock with its key, tug-test the assembly and confirm the camera hasn’t shifted before leaving.
Step 6: Stow Loose Cable Tail
After the camera passes the tug test, remove any remaining cable slack and stow the loose tail against the mount. Thread the remaining cable through the lock’s housing or a nearby retainer or bracket opening. This keeps the tail tight to the camera mount rather than hanging where brush can snag it or someone can use it as leverage.
Choose the closest available locking position that leaves only a short, controlled end. On adjustable Python-style locks, don’t select extra range just because it’s available. Keep the braided 5/16-inch (8-mm) cable protected from abrasion, weather exposure, and scraping. Ensure the tail lies flush and cannot shift into a vulnerable loop. Check the stowage after tightening, since cinching tension can settle slightly as the lock engages.
Tug-Test the Locked Cable
With the lock engaged, pull firmly on the camera and the 5/16-inch (8-mm) Python cable to verify the assembly has minimal slack. Verify the cable is fully seated in the patented locking mechanism so it grips at your selected position rather than creeping under tension.
Inspect the tree anchor and lock bracket or security case while you tug. The vinyl-coated, braided-steel cable should stay snug and mustn’t shift at either contact point.
If the camera moves or you create a visible gap, disengage, reposition, and relock it; slack gives thieves a leverage point for cutting or prying. Repeat this test after any adjustment or weather change, confirming the lock holds the same position within its 30-cm to 9.1-m locking range and maintains full security against tampering.
Troubleshoot Frozen Lock Cylinders
Cold, wet conditions can freeze a Python cable-lock cylinder even when the cable passed its tug test. Don’t force the key; hard turning can damage pin tumblers, including those in weather-tough aluminum-alloy locks. Warm the key in your hand, or lightly warm the cylinder area, then turn it smoothly.
| Symptom | Action | Security check |
|---|---|---|
| Key resists | Warm it; use dry de-icer if needed | Never twist hard |
| Cylinder opens | Pull cable taut | Re-lock at correct position |
| Freezes repeatedly | Close shutter; shelter from precipitation | Check lock before leaving |
Moisture returns through vibration or exposure around the vinyl-coated braided steel cable. Keep the cylinder shielded from direct rain and snow while the camera remains mounted. If it won’t turn, don’t compromise security; wait for safe outdoor thawing conditions.
Apply Graphite Lubricant Seasonally
Seasonally apply a small amount of graphite lubricant to the Python cable lock’s keyway or locking cylinder, especially before wet or freezing weather. This keeps the pin-tumbler mechanism cycling smoothly when moisture and temperature swings increase friction.
Use only a light application; wipe away excess so it won’t collect dirt or gunk around the shuttered cylinder. Re-lubricate at least once each season, preferably in early fall and spring. After applying graphite, insert the key and lock and open the cable several times to distribute it evenly. Then tighten the cable around the tree and tug it firmly to verify secure engagement.
If heavy rain or dust hits the lock between checks, inspect the keyway promptly and reapply graphite as needed for reliable security outdoors.
Conclusion
You can secure your trail camera in minutes by matching the cable diameter to the bracket, clearing a stable mounting surface, and locking the cable tightly around the tree. Keep the tail stowed so it can’t snag or provide leverage, then tug-test every connection before leaving.
In cold or wet conditions, protect the cylinder with seasonal graphite lubricant and clear debris before inserting the key. These steps won’t make theft impossible, but they’ll slow removal.
