
Trail Camera Setup Checklist: What to Check Every Time You Hang a Camera
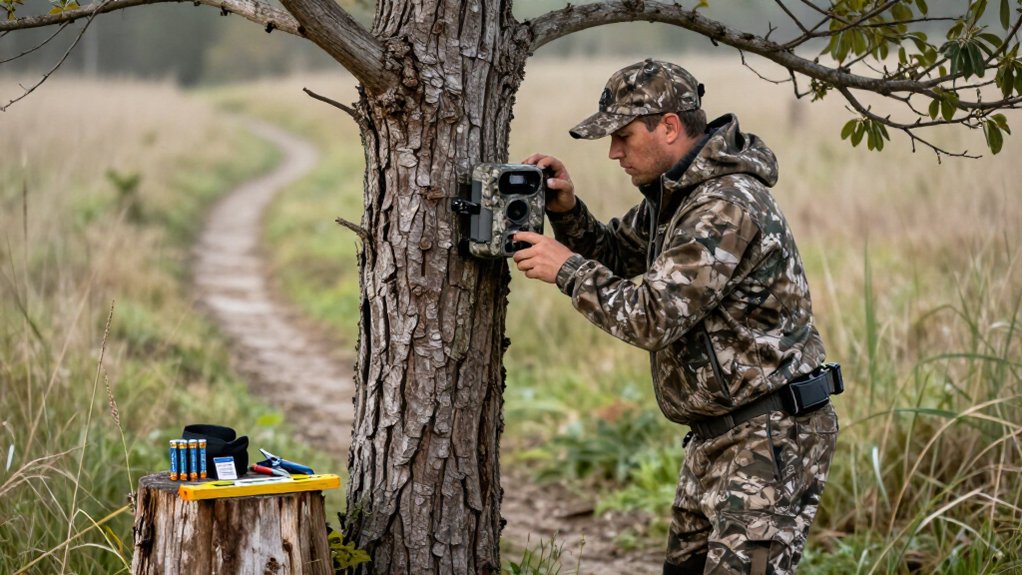
Each time you hang a trail camera, install tested batteries, format and seat an SD card, and verify date, time, burst, and delay settings. Mount it 3 to 4 feet high, aim 45 degrees along a clear lane, and avoid east or west glare.
Walk-test coverage day and night, inspect sample framing, and log wind, weather, and location. Approach downwind, use lithium in cold, and replace swollen cells immediately. Continue for steps to protect deer and data.
Reliable Photos for New Hunters
Reliable trail-camera photos start with deliberate placement and a quick field check. Mount your camera 3 to 4 feet above ground, angle it slightly downward, and aim it about 45 degrees along the trail. This orientation keeps deer inside the detection zone longer, improving identification and movement records.
When terrain allows, face the unit north; sunrise and sunset can create glare or false triggers on east- and west-facing setups. Remove grass, twigs, and branches from the frame, particularly within 15 feet, because wind-driven vegetation wastes images and distorts activity data. Walk through the detection zone before leaving and inspect the test photos for framing and trigger coverage.
On established trails, select a three-photo burst with a 5 to 10-second delay. Return every two to three weeks; limit disturbance.
Fresh Batteries, Formatted SD Card
Power management and storage preparation determine whether a trail camera documents wildlife consistently between visits. Test every battery with a ZTS Battery Tester, which applies a small load and reveals practical capacity; don’t rely on a multimeter. Install fresh cells, and choose lithium batteries in cold conditions because they retain voltage better than alkalines as temperatures fall.
- Pack a spare, compatible, empty SD card for each camera.
- Format each standard card in the specific camera that will use it; cellular cameras are the exception.
- Before you leave, confirm the card is seated, has available space, and records the correct date and time.
These steps protect your monitoring record from avoidable gaps, supporting sound wildlife observations and responsible management decisions across changing field conditions locally.
Check Cards Every Two Weeks
Check non-cellular trail cameras about every two weeks to reduce human noise, scent, and disturbance that can alter deer movement near monitoring sites. Batch nearby cameras into one midday visit when wind and weather favor a downwind approach. Don’t cross bedding cover or active scrapes.
Bring a formatted spare card, exchange it quickly, and review images elsewhere. At each unit, verify card seating, available space, and correct date and time. Then leave the area undisturbed for the next two weeks. This low-frequency protocol protects data quality while minimizing intrusion into habitat you’re monitoring. Use the same route each visit.
| Check | Method | Conservation purpose |
|---|---|---|
| Timing | Midday, downwind | Limits encounter pressure |
| Access | Avoid beds and scrapes | Protects core behavior |
| Card | Swap, verify settings | Preserves unbiased records |
Walk-Test the Detection Zone
Clear vegetation from the sensor path, then use test mode to walk the expected deer route at a normal pace. Test at the planned 25 to 40-foot distance, confirm the trail is centered in the frame at roughly a 45-degree angle, and review images on-site. Repeat the check in daylight and at night so you don’t miss wildlife or collect misleading data.
Clear the Detection Zone
Before activating the camera, remove grass, branches, and other vegetation from its view, concentrating on the first 15 feet of the detection zone. This reduces false triggers caused by wind-blown stems and sunlit leaves, conserving battery power, storage, and your time in the field.
Then use test mode to verify coverage. Walk through the expected deer travel lane at its likely distance and angle, with the camera aimed slightly across the route. Check the image on-site to confirm that the sensor and framing capture you clearly. If it misses the lane or produces an obstructed image, re-aim or reposition the unit and repeat the check before leaving.
On every maintenance visit, inspect the zone again. Seasonal growth can enter the sensor’s view, obscure animals.
Test Walking Speed
Walk-test the detection zone by moving through the expected deer travel lane at a normal walking pace, using the same distance and angle animals are likely to follow. Then review the test photos on-site. Cross the frame at a normal pace and confirm the camera captures your animal-sized target clearly, rather than recording only a partial subject or missing it entirely.
Repeat the pass after dark and check that illumination shows the target clearly. Aim roughly 45 degrees along the trail so a deer stays within the detection zone longer and is less likely to pass between captures. If the test misses you or produces poor framing, clear vegetation, re-aim the camera, or adjust sensitivity before you leave. This supports low-disturbance, reliable wildlife monitoring.
Check Trigger Distance
Why rely on an advertised range when site conditions determine actual performance? Use the camera’s test mode before leaving the site. Walk through the detection zone where deer are expected to travel, moving across the intended trail lane at the likely distance and angle. This checks whether the sensor recognizes an animal crossing its detection field.
Record the farthest reliable trigger point rather than trusting package claims: detection may extend 40 feet or more, but it varies by model and local conditions. Review test images onsite. If the camera misses you, reposition it and repeat the walk-test. This simple control reduces missed observations and supports more reliable wildlife monitoring. Repeat trials from both directions, since approach angle and vegetation can alter infrared sensor response.
Verify Camera Framing
Center the expected travel lane in the frame and aim the camera about 45 degrees along the trail, so deer remain in the detection zone longer. Keep an unobstructed view of the intended photo area, usually 15 to 20 feet from the camera. Then walk through the zone at the distance and angle deer are likely to use. Review the test photos on-site to verify that the animal is framed and the camera detects its passage.
If images miss the travel lane or vegetation causes glare, clear the obstruction, reposition or re-angle the unit, and repeat the walk-test. Finally, tighten the mount securely and inspect the frame again; fastening can shift alignment. This field check improves data reliability, reduces missed observations, and supports accurate, lower-disturbance wildlife monitoring.
Confirm Day and Night
After confirming the frame, test the detection zone under the same conditions deer are likely to encounter. Walk through the travel lane at the distance and angle you expect deer to use, then confirm the camera triggers and records the lane. Review daytime images on-site for detection and framing.
After dark, repeat the walk test to verify infrared illumination reaches the lane; detection may extend beyond usable flash range. If a test misses you, clear obstructing vegetation, adjust the camera’s angle or position, and test again. Take a reference photo after setup and note its time. Compare it with the camera’s timestamp to confirm date and time settings are correct. Accurate timestamps support responsible observation and help interpret wildlife activity without unnecessary site disturbance.
Use Lithium Batteries in Cold
In cold conditions, use quality lithium cells because they retain voltage more reliably than alkaline batteries. Test each battery with a ZTS Battery Tester before installation, since it applies a small load that better reflects field performance. Bring tested spare lithium cells, especially for cellular cameras, and replace weak batteries at each check to prevent data gaps.
Cold Weather Power Retention
Choose lithium batteries for cold-weather trail cameras: they retain voltage more reliably than alkaline cells as temperatures fall. Before installation, test each battery with a ZTS Battery Tester, which applies a small load and provides a more useful field check than a multimeter. Record the result if you monitor several camera sites, then install only batteries with enough reserve for the interval before your next planned visit.
Carry tested spare lithium batteries, particularly when servicing cellular cameras, because image transmission increases power demand. At every check, retest installed batteries and confirm their remaining charge can support expected trigger activity, nighttime imaging, and communications until you return. This routine reduces camera downtime, limits unnecessary trips to sensitive habitat, and helps maintain wildlife observations through winter.
Choose Quality Lithium Cells
Because alkaline cells lose usable voltage quickly in freezing conditions, install quality lithium batteries before deploying a trail camera. Lithium chemistry maintains dependable power as temperatures fall, helping your camera document wildlife without avoidable gaps in monitoring. Use fresh cells from a reputable manufacturer, and pack spare lithium batteries for every field visit.
Carry extra reserves when you run cellular cameras, since image transmission places a heavier demand on the power supply. At scheduled service intervals, replace cells as needed to support operation until your next planned check, reducing disturbance from unnecessary return trips. For remote sites or extended deployments, consider an external lithium pack, such as a Stealth Cam FieldMAX pack, listed from $59.95. Plan capacity around local weather and service schedules.
Check Battery Voltage
Test every battery with a ZTS Battery Tester before deployment, since its small applied load gives a more useful field-readiness reading than a multimeter. Check the camera’s battery indicator before you leave the site. Replace any weak cells now; power helps the unit continue monitoring wildlife until your next planned visit, reducing disturbance from return trips.
When temperatures fall, install lithium batteries. They retain voltage better than alkaline cells in cold conditions, supporting triggering and image capture. Cellular cameras require additional energy to transmit photographs, so carry spare lithium batteries and confirm the pack has reserve. Bring extra batteries on every setup or service trip. Record battery type, date, and location in your field log. This supports dependable data collection and avoids observation gaps.
Consistent, Correctly Dated Photos
Accurate timestamps turn trail-camera images into usable evidence of wildlife activity, so set and verify the date and time in the camera menu before mounting it. After configuration, allow the timeout period to expire, then trigger a reference photo and inspect its timestamp. This simple control confirms that the camera records the expected date and time under live conditions.
When you service, trigger camera on arrival and review images before leaving. If timestamps are incorrect, reset settings, secure the unit in live mode, and take a final reference photo. Records let you compare detections among visits and support habitat-use assessments. Review timestamps from a two-week sample to identify 30 to 45-minute morning and evening activity windows, which can guide monitoring schedules and reduce disturbance to wildlife.
Swollen Batteries: Stop Using
Battery condition deserves the same routine attention as timestamp accuracy: stop using any cell that appears swollen, bulged, or deformed. Before every deployment and service visit, inspect each battery under good light. Don’t install a damaged cell or leave it inside the camera; replace it without recharging or testing it.
A compromised casing may fail unpredictably, creating a hazard to you, equipment, and surrounding habitat. Never puncture, crush, or open the battery. Keep it isolated from heat and flammable materials until you can follow local disposal guidance. Before fitting replacements, inspect the battery compartment for corrosion, residue, warped contacts, or other damage. If you find contamination or damage, remove the camera from service and document the issue, helping maintain reliable monitoring with minimal disturbance.
Avoid East- or West-Facing Cameras
Whenever terrain allows, face your trail camera north to limit low-angle sunlight that can wash out images or cause false triggers. East- and west-facing units receive direct glare at sunrise and sunset, often when deer move. That light reduces image detail and can distort monitoring records, making responsible wildlife observations less reliable.
- If placement must face east or west, angle the camera slightly downward.
- Use a branch or mount overhang to shade the lens and sensor.
- Clear sunlit, moving vegetation from the detection zone before testing.
Before you leave, trigger the camera from several positions and inspect sample photos. Look for glare, washed-out subjects, and vegetation-driven captures. Adjust the aim or shade until the detection area records clear, useful evidence without unnecessary empty images.
Log Wind and Weather Conditions
Document wind direction, wind speed, temperature, and moisture conditions when you install each camera so later observations have a clear environmental reference. Approach from downwind, keeping your scent away from deer and reducing unnecessary disturbance. Record the date, time, forecast, and current weather beside the camera’s settings.
Note whether conditions are dry, rainy, or humid; temperature and moisture can affect battery performance, image quality, and deer movement. After rain, inspect the lens for streaks or condensation, and position the unit beneath a slight overhang when practical. Before departing, review expected weather and schedule future checks during favorable winds and stable conditions. Consistent field notes let you distinguish equipment effects from environmental variation over time, interpret detections responsibly, and refine placements without repeatedly pressuring wildlife.
Conclusion
Each time you hang a trail camera, you build a reliable record of wildlife activity. You’ll get cleaner data when you install fresh batteries, format the card, test detection, set accurate date and time, and note weather and wind. Protect animals and equipment by avoiding damaged or swollen batteries, minimizing disturbance, and choosing thoughtful camera angles. Check cameras on schedule, especially in cold conditions. Your field routine supports ethical hunting decisions and sound habitat stewardship.
