How to Set Up a Camera to Watch a Chicken Coop and Catch the Predator
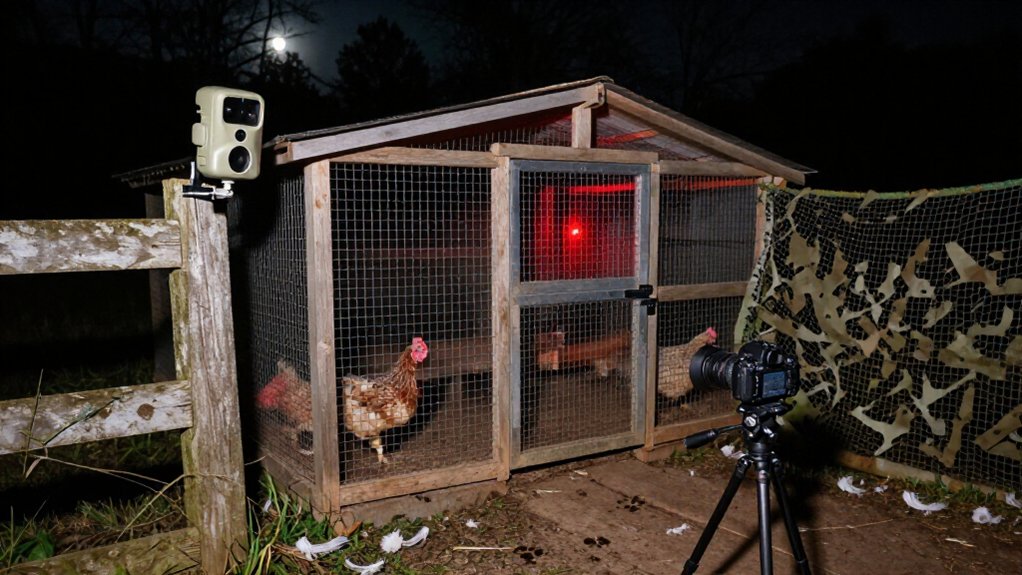
Mount a night-vision camera about eight feet high, aimed at the pop door and surrounding approach zone, with the lens slightly off-axis to mesh.
Confirm a stable 2.4 GHz signal by streaming video at the mounting height.
Install and format a high-endurance microSD card, clean webs from the lens and IR area, and weatherproof cable entries.
Test motion alerts at dusk, then review body shape, gait, and latch-testing behavior.
Next, refine overnight observations carefully.
Catch Raccoons Overnight Easily
To catch raccoons overnight, mount a Wyze Pan Cam v3 or similar camera with strong infrared night vision where it can see the coop entrance and run. Aim it across the entry-attempt zone, because raccoons inspect latches, dig edges, and linger before acting. Keep shrubs, wire, and feeders out of the foreground, and clean the lens to preserve infrared images.
Supply barn or solar power, then install a microSD card for continuous recording through darkness. Turn on motion detection and select AI predator classification, or available mode, to limit alerts triggered by leaves or wildlife. When an alert arrives, check live view.
Later, review footage to identify the animal, document its timing and behavior, and choose humane deterrents that protect chickens without harming wildlife.
Verify Coop Wi‑Fi Signal Strength
Reliable Wi‑Fi lets your camera document nocturnal activity without gaps that could obscure a predator’s approach. Walk-test the coop site with your phone, confirming reliable router access, preferably on 2.4 GHz Wi‑Fi, which many cameras require. Test at the planned mounting height; boards, walls, and metal can weaken signals.
- Load the camera app and stream a short video; bars alone don’t prove stability.
- Pair your phone and camera near the coop to confirm uninterrupted setup on the intended network.
- If service drops within a few feet, reposition the camera, add an extender, or use a mesh node.
This verification helps you collect continuous evidence, distinguish wildlife patterns accurately, and choose humane, targeted responses that protect your flock and local predators without needless disturbance over time.
Step 1: Clear Cobwebs From Camera Mount
Before each nighttime check, clear cobwebs from the camera mount so fine strands don’t collect dust or scatter infrared light into the lens. Power off the camera, let it cool, and wipe the lens and housing with a microfiber cloth. Use a dry, soft-bristle brush or compressed air at a distance to lift webs from corners, seams, and cable entry points; don’t poke the lens.
Inspect the infrared light area, since strands there can diffuse illumination and obscure a predator’s outline. If webs recur, remove the camera and clean the mounting plate where spiders anchor. This low-impact maintenance avoids pesticide use near birds and beneficial arthropods. Restore the camera, then watch live view and alerts for one to two minutes, confirming images remain sharp and detection stays responsive.
Step 2: Install MicroSD Card First
With the mount and lens clear, install a compatible high-endurance MicroSD card in the WYZE Pan Cam v3 before you power it on. This ensures the camera can format its local storage during initialization and begin recording without gaps. Choose a surveillance-rated card within the model’s supported capacity, commonly up to 128GB, to withstand repeated writing in outdoor monitoring. Insert it firmly until it clicks.
Then power the camera and check the WYZE app: local storage should appear available. If it doesn’t appear or recording fails, turn the camera off, reseat the card, and allow it to reinitialize. Finally, trigger motion and review timeline clips. Reliable local evidence helps you distinguish predators from nonthreatening wildlife and supports informed, humane protection choices during nighttime coop observations.
Step 3: Aim Lens at Pop Door
Aim the lens so the pop door sits centered in the frame, including enough surrounding ground and coop wall to show chickens entering or leaving and to verify that the door closes fully after dusk. Angle it slightly downward, and keep the door edge, seam, and latch free of branches, siding, or wires that can obscure night-vision evidence. Keep the camera reachable from a step stool, so you can adjust focus or reset it without a ladder.
If your pan/tilt camera has a home position, set it on the door and enable motion detection. Test live view and recordings at opening and closing times. Confirm that you can identify an animal at the door and verify the seal. This limits disturbance to wildlife nearby.
Step 4: Mount Camera Eight Feet High
Mount the camera about 8 feet above the ground, where most predators can’t easily reach it but you can still access its reset button or port from a step ladder. This height reduces tampering by raccoons, foxes, and other curious visitors while preserving a useful view of flock behavior.
Angle the lens downward to include roosting birds, nest boxes, and the coop entrance, rather than recording only bare ground. This perspective documents approach routes and entry attempts without requiring intrusive observation of wildlife.
Don’t mount higher if routine Wi-Fi checks, microSD service, reboots, or setting changes would demand a long ladder. At eight feet, you balance reliable nighttime identification with practical maintenance and reduce opportunities for animals to disturb equipment or alter their behavior.
Step 5: Test Motion Alerts at Dusk
Begin testing 10 to 15 minutes before sunset, when changing light can expose weak motion settings and poor infrared transfer. Aim the camera at the coop door or run entrance, and enable motion detection for low-light hours. Walk through the approach in the app’s test period, then confirm that a push notification arrives and that a microSD clip saves within seconds, if available.
At full dusk, observe the infrared changeover. Night vision should illuminate the entrance without lighting, while retaining enough detail to identify an animal or person. Narrow motion zones and lower sensitivity until branches, insects, and low-light glare don’t generate alerts. Repeat observations on two evenings. Compare alert delay and image quality, then refine settings until approaching wildlife is recorded reliably without needless disturbance.
Step 6: Weatherproof Cable Entry With Silicone
Install a dedicated exterior-rated cable entry fitting sized to the camera cable, because a bare wall hole or caulk alone can let rain follow the line into the coop wall. Create a gentle downward drip loop outside the wall so water sheds away from the enclosure. Use weatherproof connector hardware and UV-resistant, exterior-rated silicone; these materials resist ultraviolet exposure and seasonal expansion that can open leaks.
After you confirm the camera works, run a continuous silicone bead around the fitting’s edge and cable entry. Fill remaining penetration gaps without blocking drainage. Inspect the seal closely for voids or pinhole paths toward the cable or junction. This barrier limits moisture damage and helps keep electrical equipment reliable, protecting your observation site while avoiding repeated disturbance.
Review Night-Vision Footage
Each evening, review a short night-vision clip from the hours predators are most likely to approach, confirming that IR mode shows enough detail to identify an animal rather than a silhouette. Compare body shape, size, gait, and behavior; note whether an animal digs or scratches, tests door or window areas, or merely passes through.
Check sharpness, effective IR range, and whether motion tracking remains locked on the subject. Before testing, wipe the lens and trim vegetation that blocks the view or triggers misleading reflections.
Log timestamps, locations, and repeated visits. This helps separate passing wildlife from direct coop threats. If a route recurs, adjust the camera angle to document that approach path, supporting targeted, humane protection measures while preserving evidence of nearby nocturnal wildlife.
Stop Infrared Glare on Mesh
Clear night footage depends on preventing the camera’s own infrared light from reflecting off nearby wire mesh. Mount the camera so its lens sits at a slight angle, rather than pointing squarely through the grid. This redirects LED reflections away from the sensor and preserves evidence of visiting wildlife without disturbing it.
| Check | What you do |
|---|---|
| Angle | Shift lens off-axis |
| Shield | Add a short hood |
Test after dark with night mode active, moving the unit a few inches between observations; mesh distance changes hotspot location. Keep the lens and adjacent wire free of dust and webs, which scatter infrared light. If glare remains, select adjustable, directional IR and lower intensity near the fence. You’ll reduce false illumination and improve predator identification for humane response.
Replace Backup Batteries Annually
Replace your camera’s backup batteries annually, ideally before each coop season, so a power or Wi-Fi failure doesn’t erase evidence from a critical night.
Cold temperatures can make aged AA cells lose voltage abruptly, even when the status display says “battery OK.” Install fresh cells; if you use rechargeable AAs, recharge or replace them and confirm a full charge before mounting. Then verify that the camera writes footage to its microSD card while Wi-Fi is functioning. This test confirms the evidence path independently of network service. Record the change date in your phone, and perform a night-view check. Before predator season, confirm the batteries are less than 12 months old. Reliable backup power helps you document wildlife behavior and choose nonlethal, targeted coop protections.
Conclusion
With a well-aimed, weatherproof camera, you’ll document nighttime visits without disturbing wildlife or relying on traps. Check signal, power, storage, and infrared reflections regularly, then compare recordings for tracks, timing, and repeat behavior.
Your observations can identify whether raccoons, foxes, or other animals approach the pop door, helping you strengthen protection precisely. By maintaining the system and reviewing footage responsibly, you’ll safeguard your flock while respecting local predators’ ecological role in your area each season.