Trail Camera Detection Range Chart: Flash and Trigger Distance by Model
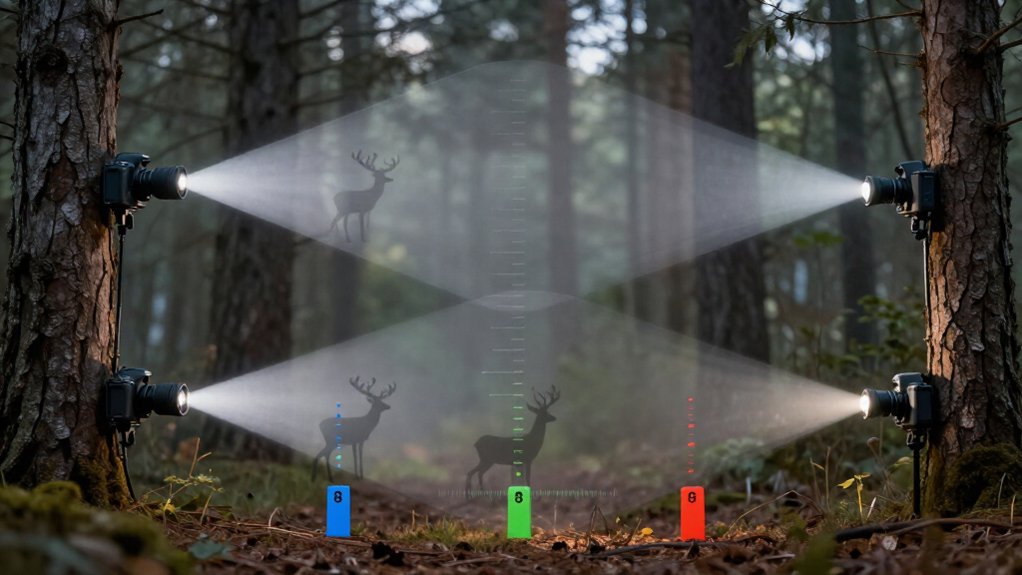
Compare PIR trigger and night-flash ratings separately: Browning Recon Force Elite HP5 reaches 30 m detection and 40 m flash; Bushnell Prime, 25 m/30 m; Command Ops, 55 ft/60 ft; and Recon Force Extreme, 80 ft/120 ft.
You’ll get more reliable night detail when flash equals or exceeds PIR range. Plan dependable medium-to-large-animal setups around 12 m, preferably with side-to-side travel. A 20 m no-glow rating illuminates, not triggers.
Continue for placement, cold-weather, and vegetation tests.
Compare Detection-to-Flash Overlap
Compare each trail camera’s PIR detection range with its night-flash range before treating its maximum distance claim as usable coverage. Detection distance measures how far the sensor can trigger; flash distance measures how far LEDs can illuminate a usable night image. You should favor cameras whose flash rating equals or exceeds PIR range, preventing triggered-but-unlit frames.
The Browning Recon Force Elite HP5’s 30-meter detection and 40-meter flash specification provides a 10-meter margin. By contrast, Bushnell’s Prime pairs 25-meter detection with 30-meter flash, leaving less edge clarity reserve. Test at your actual placement distance, typically 3 to 5 meters for medium and large mammals, because white, low-glow, no-glow, and IR systems lose effective reach under field conditions. Review same-range night images before finalizing placement and settings for coverage.
Model Detection/Flash Distance Table
The table below separates PIR detection distance from night-flash distance for representative trail camera models, so you can assess whether each unit can both trigger on and illuminate an approaching animal.
| Model | PIR detection; flash |
|---|---|
| Browning Recon Force Elite HP5 | 30 m detection; 40 m flash |
| Bushnell Prime | 25 m detection; 30 m flash |
| Browning Command Ops | 55 ft detection; 60 ft flash |
| Browning Recon Force Extreme | 80 ft detection; 120 ft flash |
Use the trigger value to position the camera where deer, hog, or bear cross its PIR field before reaching the image zone. HP5 and Prime provide 10 m and 5 m flash margins. Recon Force Extreme’s 40 ft surplus favors night corridors. Still, you’ll obtain sharper medium-to-large-mammal images when subjects pass roughly 3 to 5 m from lens, not at rated limit.
PIR Range: Meters Explained
PIR range, stated in meters, marks the farthest distance at which a trail camera’s passive infrared sensor can detect enough moving body heat to trigger; for a medium-to-large animal, about 12 m (39 ft) is a dependable real-world benchmark under good conditions.
Use each model’s listed PIR figure as a ceiling, not a guaranteed field distance. You’ll usually get the strongest trigger performance when deer or similarly sized animals cross the detection zone side-to-side. An animal walking directly toward the lens changes the sensor’s heat pattern less abruptly, so it may trigger later or closer.
On hot summer afternoons, reduced contrast between an animal and its surroundings can shorten effective range; cooler mornings and evenings often improve it. Detection doesn’t guarantee usable illumination distance.
No-Glow Flash: 20 Meters
On a model rated for 20 m no-glow flash, you get invisible infrared illumination and black-and-white images without the visible burst that can spook wildlife.
Don’t equate that 20 m lighting rating with trigger distance: near the limit, image detail and brightness typically decline. For sharper results, place your camera so expected animal movement falls within the model’s shorter effective night range.
Invisible Infrared Illumination
Although no-glow trail cameras conceal their black IR emitters from animals and people, they typically record night scenes in monochrome and deliver their strongest usable illumination well inside the advertised 20 m (65 ft) maximum.
In this 20 m class, the stated distance describes an ideal illumination limit, not guaranteed image detail across every setup. You’ll get the most reliable results when you aim the camera directly at the monitoring zone and keep expected travel paths centered in its field of view.
Black-IR LEDs preserve concealment but provide less visible-light output than white-flash systems, so image brightness and contrast decline toward the specification. Consult model specs for IR-array beam angle and mounting height. Poor alignment can still trigger on movement, producing dark subjects too.
Effective Night Range
For a no-glow trail camera rated in the 20 m (65 ft) class, treat roughly 20 m as the practical limit for a discernible, adequately illuminated nighttime subject, not as a promise of fine detail at every distance.
On a 20 m black-LED model, judge night performance by illumination rather than its advertised maximum. Invisible LEDs produce monochrome frames, and output declines across the field. Near 20 m, subjects may remain recognizable yet lose texture and fine detail.
Place the camera so the travel line stays within that illuminated zone. This gives the sensor reflected infrared light and reduces grainy captures. Test your model at 10, 15, and 20 m with intended mounting height and angle. Use the clearest result to set your field placement.
Trigger Distance Limits
A 20 m no-glow trail camera may detect motion beyond its rated flash range, but you shouldn’t expect clear nighttime images at those distances. Manufacturers sometimes advertise longer PIR detection figures, yet a black-LED model’s practical night trigger limit is typically about 20 m. Beyond that point, detection events can still occur, but the sensor, subject speed, and trigger timing increasingly produce missed or partial captures.
For deer monitoring, position the unit so a travel line crosses focal zone 3 to 5 m inside the 20 m boundary. This placement gives the PIR sensor time to react before an animal exits the frame. Treat 20 m as an operating threshold, not a guaranteed capture distance. For consistent night triggering beyond 20 m, choose low-glow or white-flash.
Image Clarity At Range
At 20 m, a no-glow trail camera’s black-LED flash often produces dark, grainy, low-contrast night images, even when its PIR sensor triggers reliably at that distance.
At this range, separate detection specs from usable identification range. A model rated for 20 m may record an animal yet lack enough IR exposure for species or coat-detail confirmation. Black LEDs remain invisible; reduced reflected light raises noise, suppresses contrast, and weakens motion detail. Compare model-specific 20 m night samples for center-to-edge exposure, subject sharpness, and blur, not megapixels. Megapixels can’t restore photons absent from the sensor. Most models produce clearest no-glow images at roughly 3 to 5 m for medium and large mammals. At 20 m, assess whether subjects remain fully framed; fading animals are harder to identify.
Ideal Camera Placement
Place a no-glow trail camera about 20 m from the monitored corridor to cover a useful detection area, but position it so animals pass within 3 to 5 m of the lens for the sharpest night detail. This layout matches the practical working limit of black-LED models: they can trigger farther away, yet illumination falls quickly beyond the close pass zone. Mount the unit 80 to 120 cm (31 to 47 in) above ground, angle its PIR sensor across, not directly down, the travel line, and remove grass, twigs, and branches from the V-shaped detection field.
On corridors exceeding 20 m, move the camera nearer the expected path instead of depending on nominal flash range. You’ll reduce dark, grainy frames and motion blur. For ID across 20 m, white-flash usually preserves detail.
Use 12-Meter Placement
For a 12-meter (39-foot) setup, choose a trail camera with a dependable advertised detection range of about 12 m and mount it 80 to 120 cm (31 to 47 in) above the ground. A model rated “up to 12 m” should face a trail so deer cross the PIR field near its outer detection boundary; then remain inside the image frame when the shutter fires. Keep the camera square to the expected travel line; steep angles reduce usable sensor coverage. Check the model’s separate flash specification before relying on this distance.
A 12 m trigger rating doesn’t guarantee that its infrared or white flash delivers readable antler, ear-tag, or coat detail at 12 m. Treat 12 m as the maximum dependable layout, not a buffer. Prioritize cross-trail movement.
Cold Weather Shortens PIR Range
Cold weather can shorten a trail camera’s usable PIR range below its advertised maximum because the sensor must detect a moving deer’s changing infrared contrast against the background.
On a model rated to trigger at 12 meters, don’t assume every cold-weather pass produces a dependable 12-meter event. As ambient conditions shift, the deer to background differential heat signal can fall closer to the PIR’s activation threshold, so effective range and apparent trigger response may decline. Test each model at your expected winter temperature rather than relying on its catalog maximum.
For a 12-meter camera, position it substantially nearer to the trail, about 6 to 8 meters, then verify captures across several cold nights. This margin gives the sensor a stronger changing heat target and reduces missed deer detections.
Bobcat Crossing at 8 Meters
At 8 meters, a bobcat provides a practical field test for cameras rated around 7.5 to 12 m (25 to 40 ft) of PIR detection: set the unit to cover a side-to-side crossing rather than a head-on approach, which produces stronger motion across the sensor’s zones.
At this distance, position the camera so the cat’s body fills more than 60% of the frame; this avoids partial-body captures and matches a detection-test threshold. A model advertised with a 30-m flash range should illuminate it well enough to show discernible fur detail.
No-glow black-flash models deliver black-and-white frames and can look darker or grainier at 8 m than white-flash units, even when PIR triggering and illumination succeed. Verify alignment with repeated lateral passes before treating model’s rated range as validated.
False Triggers From Swaying Grass
Swaying grass can produce repeated false triggers when wind moves tall stems, weeds, or leaves through a trail camera’s PIR zone, creating differential heat-and-motion changes that resemble an animal. Your camera may log empty frames because its PIR sensor responds to changing infrared contrast, not animal identity. Nearby vegetation expands the effective foreground detection area, so even a model rated for a narrow central zone can catch motion before an animal reaches center frame.
- Trim grass and weeds within the first few feet, prioritizing the sensor’s center V-shaped spread.
- Remove leaves crossing the lens-side foreground; they can cause empty images or half-animal frames.
- Secure each model with a tight strap or rigid bracket, because wind-driven housing vibration compounds background motion and false trigger frequency.
Record 25°C Test Conditions
After clearing wind-moved vegetation, record each model’s detection and flash specifications under the same 25°C test condition. Treat detection as PIR-trigger distance and flash as IR/LED illumination distance; don’t combine them into one range. For each model, use detection first to judge whether a deer or other animal will reliably fire the camera at your planned trail offset.
- Model A: log the listed trigger distance, then place the camera within its dependable few-to-several-meter deer-trail zone.
- Model B: compare its flash figure separately; a longer advertised flash range doesn’t prove equal practical detection.
- Model C: note illumination type, white flash or no-glow IR, because usable night-photo detail can differ at identical 25°C distances.
This is normal: triggering and illumination measure different limits when you interpret the chart.
Conclusion
You’ll get the most usable night captures when your chosen model’s PIR detection zone overlaps its flash reach. Compare manufacturer values in meters, then validate them at 25°C: a 20 m no-glow unit may detect farther than it illuminates. Set most cameras about 12 m from the trail; your bobcat at 8 m remains well covered. In cold weather, expect shorter PIR range, and clear swaying grass to reduce false triggers. Record model-specific results locally.
Game Camera Range & Detail Calculator
Turn a game camera's MP, horizontal FOV and distance into frame width, pixels on the animal and the max range for your own detail minimum.
Trail Camera Flash Type Selector
Answer three questions to rank no glow, low glow, infrared, white flash and color night vision trail cameras for your use.