How to Mount a Trail Camera Without a Tree in Fields and Food Plots
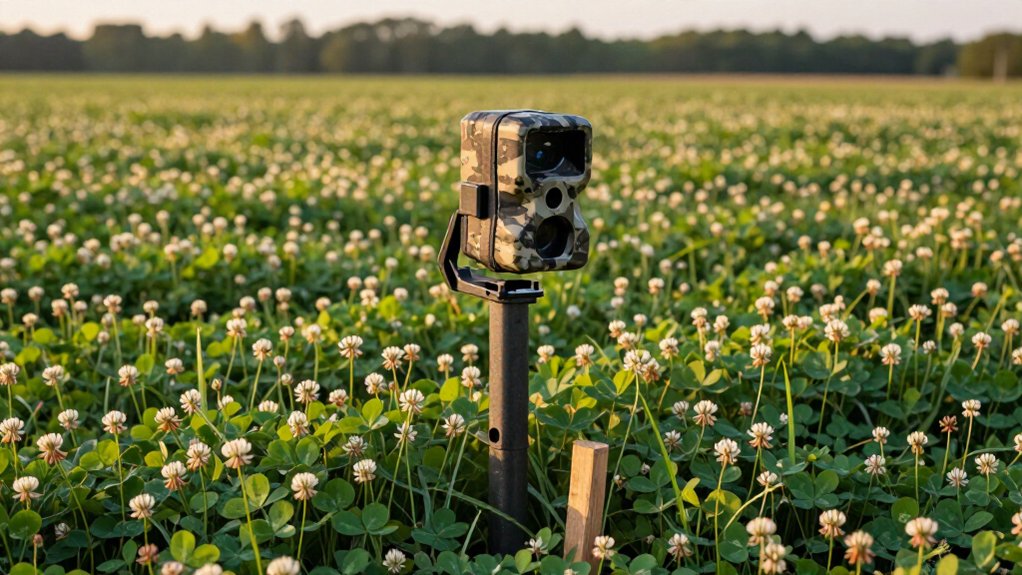
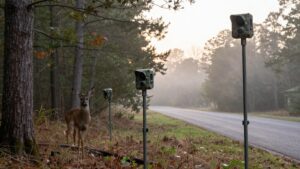
Mount your trail camera to a straight, firmly driven steel T-post beside a deer trail or food-plot edge. Clear grass and branches from the detection lane, then keep the crossing centered within 10 yards.
Set the camera 3-4 feet high for deer body and antler detail, aim across the route, and face north when possible. Use a secure bracket, test a photo from the trail, and correct glare, wobble, or blocked views. Setup details follow.
Metal Stake Setup: 15 Minutes
When no tree stands near your field edge, a metal stake gets your camera up and running in about 15 minutes flat. Pick a spot where deer naturally cross the field or food plot, then drive your stake deep enough to stay firm under wind and wildlife contact. Mount the camera 3-4 feet high for deer-level shots, or raise it and angle down if theft’s a concern.
Tighten the camera to the stake and aim it at the travel path, keeping target animals within 10 yards for sharp detail. Face the camera north whenever possible—this cuts sun glare and washed-out images. Skip due east or west orientations entirely. Drive the stake, frame the shot, and test it; 15 minutes gets you dialed in and capturing deer activity.
Gather a Steel T-Post
Start with a sturdy, straight steel T-post that’s long enough to stay firmly anchored while positioning a deer camera about 3 to 4 feet above ground. This height captures clear, species-specific images.
- Inspect it for bends, twisted flanges, corrosion, or a loose anchor plate; reject any post that can shift.
- Match the post length to your target height: 3 to 4 feet serves deer travel routes and food-plot edges.
- Pack a compatible bracket or strap; bare T-posts rarely give trail cameras a secure, level attachment surface.
On public land, raise the camera to roughly 10 feet and angle it downward, which can deter theft while preserving deer activity below. Use this elevated option only when you can safely access the unit for battery changes and image retrieval later.
Step 1: Clear Grass Around Mounting Spot
Clear tall grass and weeds from the T-post base and the camera’s viewing lane, because wind-blown stems near the PIR sensor can create false triggers and obscure deer images. Cut or trample vegetation in a tight radius around the post rather than mowing the whole food plot; disturbing extra ground can push wary whitetails off their established travel routes.
Focus your clearing on the direct sightline between the lens and the spot where deer will pass, since even knee-high stalks swaying at 10-15 mph can fire the sensor repeatedly and drain batteries with empty frames. Once you’ve cleared the area, walk out to the expected travel corridor and stand where deer will cross. Check your camera’s screen or test shots to confirm that lane stays open and unobstructed.
Step 2: Mark Camera’s Target Zone
Identify the exact point where deer naturally enter, cross, or feed, then stand there and verify the camera frames that target zone before you leave. Position this zone along a natural travel route with regular, undisturbed deer movement, preferably where tracks, droppings, or browsed edges confirm repeated use.
Keep the expected deer path within about 10 yards of the lens for close-up images that support individual age, antler, and behavior assessment. Clear any remaining grass, stems, branches, or loose debris inside the viewing area so wind movement doesn’t create false triggers. If your camera sits about 10 feet high, angle it downward and recheck that the detection zone covers the trail or food-plot edge where deer actually travel. Use a visible marker temporarily to confirm range and framing.
Step 3: Drive the T-Post In
Once you’ve marked the exact target zone, it’s time to anchor your camera support there. Set a sturdy T-post at the field or food-plot edge, beside the deer trail. Position it so whitetails pass within about 10 yards, providing useful age, sex, and antler images. When practical, plan a north-facing view to reduce sunrise and sunset glare.
Use a post driver to sink it firmly; it shouldn’t wobble in wind or while you service the camera. Keep enough post exposed for a 3–4-foot deer-level camera height. Before you leave, stand at the expected crossing and check framing. Clear grass, weeds, and loose debris from the viewing lane because moving vegetation triggers false captures. This setup records body size and direction without blocking deer movement.
Step 4: Clamp Camera to T-Post
With the post set, attach your camera’s bracket or strap-mount to the T-post at 3–4 feet, matching a whitetail’s typical chest-to-head height for clean body and antler shots. Tighten the clamp until the housing cannot rotate, slip, or vibrate in wind. Position it to watch a defined travel route or food-plot edge, where deer should pass within roughly 10 yards. That distance keeps whitetails large enough for identification while preserving a detection zone.
Orient the lens north whenever site layout allows; direct sun can wash out image detail. Cut grass, weeds, and dangling stems inside the detection area so wind-driven movement doesn’t consume battery life or create false triggers. Before leaving, walk the route at deer height and confirm trigger response and framing.
Step 5: Recheck Angle for Shadows
Recheck the camera at midday and again near sunrise or sunset, because shadow length can change the detection zone dramatically. At noon, confirm the short-shadow view captures deer, turkey, or hog travel through expected crossing points at species-appropriate sensor height without cutting off body height. Then inspect framing during low-angle light.
Long shadows from T-post, stake, or vegetation can cross sensor area, hide animal outlines, or create contrast shifts that trigger false captures. Stand on trail and check whether a deer-sized target remains visible from entry through exit. Aim north whenever layout allows; this limits glare and shadow movement. Avoid due-east or due-west placement, which can wash out sunrise or sunset images. If shadows sweep through the zone, rotate or reposition mount and retest.
Step 6: Lock Housing, Clear Debris
After you finalize the angle, tighten the lock housing firmly to the T-post, stake, or other support so wind, livestock contact, or a bumped mount can’t alter the sensor zone. Close and lock it once your settings are complete, reducing casual tampering and shielding the camera from field handling. Then clear every blade of grass, weed stem, branch, and loose debris from both the lens view and the detection zone. Even light vegetation can swing in a breeze, create repeated infrared triggers, and fill your card with empty images instead of deer, turkeys, or hogs. Keep low growth outside the sensor’s path, and revisit the site after storms or rapid crop growth, when cover can reenter the zone without disturbing your secured camera’s position.
Snap a Test Photo
Snap a test photo before leaving the field: stand in the expected deer, turkey, or hog travel line, preferably within 10 yards of the camera, and trigger an image.
Review the photo on the camera screen before deployment. Confirm that the target zone is fully visible: a deer trail, turkey feeding edge, or hog entry route. Check whether the camera records the intended ground area rather than empty crop rows, sky, or a nearby obstruction. If the animal travel line falls outside the frame, reposition the unit and repeat the test. This quick verification shows how your selected capture mode, detection zone, image resolution, flash setting, and time stamp appear under current field conditions. Run the same check for each camera in the plot.
Blurry Photos? Check Lens Angle
Blurry or poorly framed images often result when the lens points past the animal’s travel line instead of across it. Aim across the field or plot, so deer, turkeys, or hogs pass within about 10 yards. Stand on the expected route and confirm framing before you leave.
| Species | Lens angle | Expected result |
|---|---|---|
| Deer | Across trail | Sharp broadside image |
| Turkey | Level plot edge | Full-body frame |
| Hog | Across entry | Reduced motion blur |
| Elevated mount | Down toward trail | Centered detection zone |
Face the camera north when possible; east or west light can wash out dawn and dusk movement. If you mount it 10 feet high, tilt it downward toward the trail. Avoid low angles or vegetation that block legs, faces, and antlers. This keeps each target centered inside the detection zone.
Rust-Proofing Your T-Post
Wet soil and crop residue can corrode an unprotected T-post, so start with a galvanized post and inspect its coating before you mount a camera. Focus on chips and scratches, especially at the ground line, where wet soil holds moisture against steel. Brush exposed spots clean, apply rust-inhibiting primer and outdoor metal paint, and let each coat dry according to its label.
Use galvanized or stainless-steel fasteners and a corrosion-resistant mount to limit rust at connection points. This matters when you monitor deer trails or turkey feeding areas, where repeated checks can loosen hardware. After the season, remove soil and plant residue, inspect the coating, and repair bare metal before storage or reinstallation. That routine protects post stability through the next wet season reliably.
Conclusion
You don’t need a tree to get sharp, usable trail camera data in open fields and food plots. A T-post, driven 18 inches deep and leveled to a 3-foot lens height, gives you the stability and consistent angle whitetail and turkey activity demands. Clear your sightline, lock your housing, and snap that test photo before you walk away. Fifteen minutes of setup now means weeks of reliable, blur-free intel on the animals using your plot.